RESTDocs 도입하기
이 포스팅은 우아한테크코스 6기 팀 ‘크루루’의 백엔드 크루 명오가 작성하였습니다.
도입 배경
저희는 자동으로 API 문서를 만들기 위해 Swagger와 RESTDocs 사이에서 고민했습니다. 저희가 느낀 각각의 장단점은 아래와 같습니다.
- Swagger
- 장점: 프론트 입장에서 보기 편하고, API 테스트하기 편합니다.
- 단점: 프로덕션 코드에 기능과 관련 없는 어노테이션이 들어갑니다.
- RESTDocs
- 장점: API에 대한 테스트를 무조건 작성해야 하므로, 엣지 케이스에 대한 테스트를 까먹는 경우를 방지할 수 있습니다.
- 단점: Swagger보다 시간이 더 많이 소요됩니다.
저희 팀은 Postman을 사용하여 API를 테스트하기 때문에, Swagger의 장점이 살아나지 않는다고 생각하여 RESTDocs를 채택하게 되었습니다.
기본 설정
Java 17, Spring Boot 3.2.4 기준입니다.
Gradle 설정
  plugins {
    id 'org.asciidoctor.jvm.convert' version '3.3.2'
}

configurations {
    asciidoctorExt
}

dependencies {
    asciidoctorExt 'org.springframework.restdocs:spring-restdocs-asciidoctor'
    testImplementation 'org.springframework.restdocs:spring-restdocs-restassured'
}

// build/generated-snippets 폴더에 스니펫이 생깁니다.
ext {
    snippetsDir = file('build/generated-snippets')
}

test {
    outputs.dir snippetsDir
}

// src/docs/asciidoc 폴더에 adoc 확장자로 만든 문서를 html로 변환합니다.
asciidoctor {
    configurations 'asciidoctorExt'
    baseDirFollowsSourceFile()
    inputs.dir snippetsDir
    dependsOn test
}

// 최신화를 위해 전에 복사된 html 파일을 삭제합니다.
asciidoctor.doFirst {
    delete file('src/main/resources/static/docs')
}

// html로 변환한 문서를 src/main/resources/static/docs 파일로 복사합니다.
task copyDocument(type: Copy) {
    dependsOn asciidoctor
    from file("${asciidoctor.outputDir}")
    into file("src/main/resources/static/docs")
}

build {
    dependsOn copyDocument
}

bootJar {
    dependsOn asciidoctor
    from("${asciidoctor.outputDir}") {
        into 'static/docs'
    }
}
test 기본 설정
저희는 모든 Controller 테스트가 아래 클래스를 상속받게 하여, 문서화 관련 설정을 이 클래스에 작성했습니다.
  @SpringBootTest(webEnvironment = SpringBootTest.WebEnvironment.RANDOM_PORT)
// 아래 클래스를 등록해야 문서가 작성됩니다.
@ExtendWith({RestDocumentationExtension.class})
public class ControllerTest {
		// 상속받는 클래스에서 사용하기 위해 접근 제어자를 protected으로 사용했습니다.
    protected RequestSpecification spec;

    @BeforeEach
    void setPort(RestDocumentationContextProvider restDocumentation) {
        spec = new RequestSpecBuilder().addFilter(
                        documentationConfiguration(restDocumentation)
                                .operationPreprocessors()
                                // 입출력 JSON을 문서에서 이쁘게 보이도록 만들어줍니다.
                                .withRequestDefaults(prettyPrint())
                                .withResponseDefaults(prettyPrint()))
                .build();
    }
}
코드 사용법
- given()의 인자로 spec(RequestSpecification)을 넣어줍니다.
- filter()의 인자로 document() 정적 메서드를 삽입합니다.
-
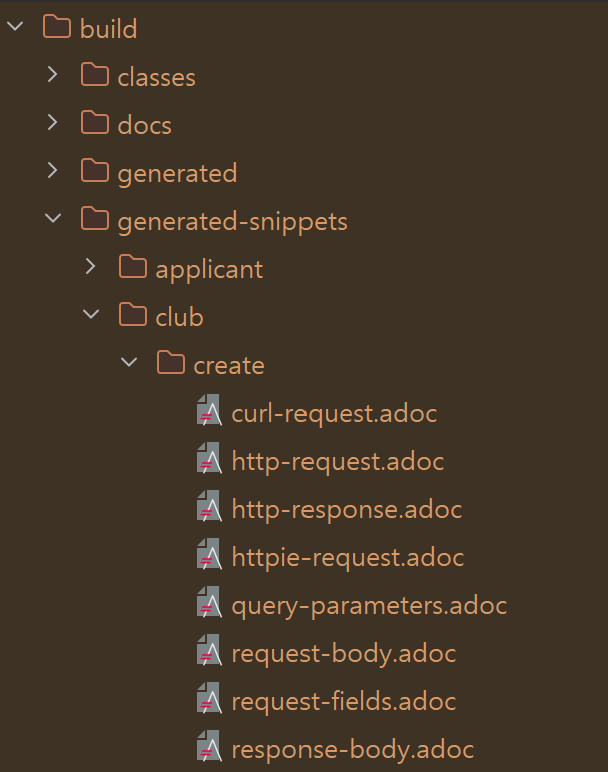
document()의 첫 인자는 식별자로, 식별자 경로에 스니펫들이 저장됩니다. 스니펫이란, adoc 확장자로 저장된 API 정보 조각입니다. 스니펫은 기본 6개가 존재합니다.
기본 스니펫 목록
- http-request
- http-response
- curl-request
- httpie-request
- request-body
- response-body
-
두 번째 인자부터는 여러 메서드를 삽입할 수 있습니다. 각 메서드는 하나의 스니펫을 생성합니다. 스니펫의 이름은 camel case를 kebab case로 변환한 것입니다.
메서드 목록
- queryParameters()
- pathParameters()
- requestFields()
- responseFields()
- requestHeaders()
- responseHeaders()
- requestCookies()
- responseCookies()
-
이 메서드들 내부에는 특정 값 혹은 경로를 문서화하는 메서드를 여러 개 삽입할 수 있습니다. 이 메서드들은 .description()을 체이닝하여 설명을 추가할 수 있습니다.
메서드 목록
- parameterWithName(), 위의 1,2번에 사용됨.
- fieldWithPath(), 위의 3,4번에 사용됨.
- headerWithName(), 위의 5,6번에 사용됨.
- cookieWithName(), 위의 7,8번에 사용됨.
-
예제: 동아리 생성 테스트 코드
  @DisplayName("동아리 생성 성공 시, 201을 응답한다.")
@Test
void create() {
    String name = "club name";
    ClubCreateRequest request = new ClubCreateRequest(name);
    String url = String.format("/v1/clubs?member_id=%d", member.getId());

    RestAssured.given(spec).log().all()
            .contentType(ContentType.JSON)
            .body(request)
            .filter(document("club/create/",
                    queryParameters(parameterWithName("member_id").description("동아리를 생성한 사용자의 id")),
                    requestFields(fieldWithPath("name").description("생성할 동아리의 이름"))
            ))
            .when().post(url)
            .then().log().all().statusCode(201);
}
위 테스트가 통과하면 기본 경로인 build/generated-snippets/ + 식별자인 club/create/ 경로에 문서를 생성합니다. 기본 스니펫을 포함하여 query-parameters.adoc, request-fields.adoc 스니펫이 추가되어 총 8개의 스니펫이 생성됩니다.
주의 사항: clubCreateRequest에 들어가는 name이 club name 이라는 영어 값이 들어가 있는 것이 의아할. 수 있는데, 여기에 한글을 넣으면 빌드 시 테스트가 실패하는 오류가 발생하니 영어로 넣어주어야 합니다.
주의 사항: 경로 끝에는 반드시 / 를 넣어주어야 합니다. 로컬에서 build할 때는 문제가 없지만, 리눅스 환경에서 build 한다면 에러가 발생할 수 있습니다.
예제2. 지원자의 상세 정보 읽어오기 테스트 코드
  @DisplayName("지원자의 상세 정보를 읽어오는 데 성공하면 200을 응답한다.")
@Test
void readDetail() {
    // given
    Dashboard dashboard = dashboardRepository.save(createBackendDashboard());
    Process process = processRepository.save(createFirstProcess(dashboard));
    Applicant applicant = applicantRepository.save(createApplicantDobby(process));
    Question question = questionRepository.save(new Question("나이", 0, dashboard));
    answerRepository.save(new Answer("28", question, applicant));

    // when&then
    RestAssured.given(spec).log().all()
            .filter(document("applicant/read-detail-profile/",
                    pathParameters(parameterWithName("applicant_id").description("정보를 읽어올 지원자의 id")),
                    responseFields(fieldWithPath("details").description("지원자의 질의응답"))
                            .andWithPrefix("details[].",
                                    fieldWithPath("order_index").description("질문 순서"),
                                    fieldWithPath("question").description("질문"),
                                    fieldWithPath("answer").description("응답"))
            ))
            .when().get("/v1/applicants/{applicant_id}/detail", applicant.getId())
            .then().log().all().statusCode(200);
}
주의 사항: 이번에는 get의 경로가 url 변수로 빠지지 않고 내부에 들어가 있는 것을 확인할 수 있는데, 이렇게 하지 않으면 applicant_id 파라미터를 인식하지 못하기 때문에 pathParameter를 사용하는 경우에는 위와 같이 해주어야 합니다.
주의 사항: 배열 안의 필드를 문서화하고 싶다면, 그 필드가 무조건 하나 이상은 존재해야 합니다.
전 예제에서 다루지 못한 점은 ~~Fields()로 끝나는 메서드의 특수성인데, .andWithPreFix() 메서드를 체이닝할 수 있습니다.
위의 responseFields 코드에서 .andWithPrefix를 사용하지 않으면 아래와 같이 표현할 수 있습니다.
  responseFields(
        fieldWithPath("details").description("지원자의 질의응답")
        fieldWithPath("details[].order_index").description("질문 순서"),
        fieldWithPath("details[].question").description("질문"),
        fieldWithPath("details[].answer").description("응답")
)
andWithPrefix()를 사용하면 상수 분리가 쉽습니다. 아래와 같이 분리하고 재사용할 수 있습니다.
  private static final FieldDescriptor[] FIELD_DESCRIPTORS = {
        fieldWithPath("order_index").description("질문 순서"),
        fieldWithPath("question").description("질문"),
        fieldWithPath("answer").description("응답")
};

responseFields(fieldWithPath("details").description("지원자의 질의응답"))
        .andWithPrefix("details[].", FIELD_DESCRIPTORS)
ASCIIDOC
생성된 스니펫들은 API 조각일 뿐이기에, 문서로 만들어주려면 이를 합쳐야 할 필요가 있습니다. 문서화는 adoc확장자로 생성해야 하며, gradle build 이후 gradle에서 지정해준 폴더에 html 파일로 복사됩니다. 이 html 파일은 어플리케이션을 실행하고 localhost:8080/docs/{파일명}.html 경로로 접근하여 확인할 수 있습니다.
주의 사항: html 문서로 변경할 adoc 파일은 반드시 src/docs/asciidoc/ 경로에 있어야 합니다.
예제1. index.adoc
  = 크루루 API 문서 v1.0
:source-highlighter: highlightjs
:toc: left
:toclevels: 3
:toc-title: API 목록
:sectnums:

include::applicant.adoc[]
include::club.adoc[]
include::dashboard.adoc[]
include::evaluation.adoc[]
include::member.adoc[]
include::process.adoc[]
=, ==, ===, ====: 제목 단계를 나타냅니다. = 개수가 많을수록 더 작은 제목이 됩니다.
source-highlighter: 글씨에 색을 입혀줍니다. 저는 highlightjs를 사용했는데, json 형식에 색이 입혀집니다.
toc: 목차가 생성되며, 어디에 생성할지를 정해줍니다.
toc-level: 목차에 어느 정도 계층까지 보일지 설정합니다. 뒤에 있는 숫자는 최대 보이는 = 의 개수를 나타냅니다.
toc-title: 목차의 제목을 설정합니다.
sectnums: 목차에 자동으로 인덱스 숫자를 부여해줍니다.
include: 해당 adoc파일을 아래에 추가하여 보여줍니다.
주의 사항: gradle 설정에 baseDirFollowsSourceFile()을 사용하지 않으면, build 과정에서 index.adoc 파일과 같은 위치에 있는 adoc 파일 include가 정상 동작하지 않습니다.
예제2. club.adoc
  == 동아리

=== 동아리 생성

==== 성공

operation::club/create[snippets="http-request,query-parameters,request-fields,http-response"]

==== 실패: 존재하지 않는 사용자

operation::club/create-fail/member-not-found[snippets="http-request,query-parameters,request-fields,http-response"]

==== 실패: 조건에 맞지 않는 동아리 이름

operation::club/create-fail/invalid-name[snippets="http-request,query-parameters,request-fields,http-response"]
operation: 해당 경로에 있는 스니펫들을 보여줍니다.
[snippets=””]: 어떤 스니펫을 보여줄지 지정합니다. 지정하지 않는 경우 모든 스니펫들이 보입니다. “” 내부에는 스니펫 파일의 이름을 적고, 이름 사이에는 ‘,’를 삽입하여 구분합니다. 띄어쓰기를 하는 경우 인식이 되지 않으므로 주의해야 합니다.
마치며
이로써 저희는 당시 버전에 대한 API 문서 생성을 완료했습니다. 직접 해보고 느낀 점은 RESTDocs가 예상치 못한 오류를 자주 발생시키고, 테스트 코드 공간을 많이 차지한다는 것을 느꼈습니다. 하지만 API 문서를 계속 수작업으로 만들 필요 없이 최신화를 할 수 있다는 것은 큰 장점으로 느껴졌습니다. 또한, RESTDocs의 오류 메시지는 친절하여 오류의 원인을 어렵지 않게 찾을 수 있다는 것도 좋았습니다. 공식 문서의 설명도 친절하게 나와있으니 읽어보시는 것도 추천드립니다.